
Notedock Features: Searching
This is part of a new series of posts highlighting Notedock’s features and functionality. From the very beginning, we’ve built many features into Notedock that can help you work faster. Up till now, most of them have been “hidden” features, that most of our users haven’t discovered yet. Hopefully, with this series of posts, you’ll learn something new that can supercharge your workflow!
Ok, first let’s start with the all important ‘search’ functionality.
Simple Search

Inside your Notedock, you’ll find a regular search bar on every page. If you’re on mobile (or a smaller screen), you’ll see 3 horizontal bars at the top, clicking that will show you the navigation and search bar. From there, you can type in what you want to search and click ‘Enter’ (or ‘Go’, or whatever the equivalent is for your phone).
That is Notedock search in it’s most simple form. This is what it does behind the scenes:
- Notedock matches your search query with all the titles, tags and content you have access to.
- You’ll be returned to a list of pages that have been matched, and you can sort them by newest added, oldest added and also alphabetically.
But even with sorting, you still might have a huge list of pages facing you. How can you narrow that down even more? This is where Advanced Search is useful. Let’s talk about this next…
Advanced Search
Here’s where we put more power in your hands! First, click over to the ‘Advanced Search’ page on the navigation panel.
Don’t panic! The Advanced Search panel looks daunting, but it’s easy once you get a hang of it.
If you’ve ever dealt with SQL, you should be right at home. Advanced Search simply runs SQL queries on your content, where you’ll be able to set the ‘WHERE‘ clause.
- You’ve got ANDs and ORs to combine titles, content and tags.
- For equality conditions, you have ‘is‘ which equates to SQL’s ‘=’ conditional operator, and ‘like‘ which is the same as SQL’s LIKE (with wildcards on both sides).
If this is the first you’re hearing of SQL, it’s still easy to get a hang of. You simply make conditions to match your content’s titles, text and/or tags.
- For each of these, you can choose to match exactly what you’ve entered into the search box (‘is’), or match something like it (‘like’).
- Then you can put them in combinations of ANDs (green buttons) and ORs (yellow buttons).
- ANDs will only return results which satisfy all your given conditions for a given clause (boxed shaded area).
- ORs will return results which have passed at least one of the AND clauses.
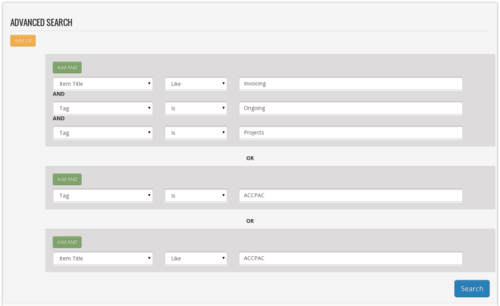
Here’s an example:
We want all items where…
1) (the title has ‘Invoicing’ in it) AND (one of the tags is ‘Ongoing’) AND (one of the tags is ‘Projects’)
OR
2) one of the tags is ‘ACCPAC’
OR
3) the title has ‘ACCPAC’ in it
Here’s what that would look like constructed on your Advanced Search page:
Tips & Tricks
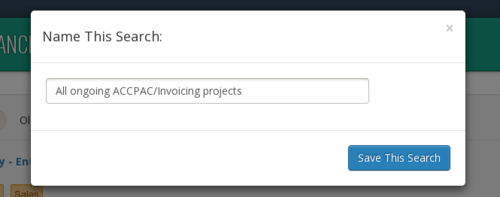
1) Saving Searches

You might’ve spent a couple of minutes carefully crafting your Advanced Search query.
Now you’re asking, “do I have to do that every single time I use advanced search?”.
Nope. You can save those precious minutes by saving your search.
Once the results of your search come up, you’ll see a button on the top right of the page, asking if you want to ‘Save This Search?’.
Then you’ll be asked to name your search, which you can then access in the future from the ‘Saved Searches’ page (found on the navigation panel).
2) Tag Search
We haven’t talked about tags yet in this series, but in case you didn’t know, you can click on them.
Clicking on them does a search on tags ONLY. It returns a list of your content that has the tag you clicked.